Integration
There are 2 ways to integrate Paylot into your web or mobile applications. These are as follows:
- Paylot Inline: This provides a Javascript library that you can include in any webpage to easily to use our payment widget with minimal code.
- Paylot Standard: This is necessary when you want a fully customized experience. It provides an API endpoint you can use to generate a wallet address, memo (BEP32 tokens) and the amount the customer is required to send.
1. Paylot Inline JS Client
Paylot inline javascript client offers a simple, secure and convenient payment flow for web and mobile. It can be integrated with a line of code thereby making it the easiest way to start accepting payments. It also makes it possible to start and end the payment flow on the same page, thus combating redirect fatigue.
Here is a sample code that calls Paylot and also handles outcome.
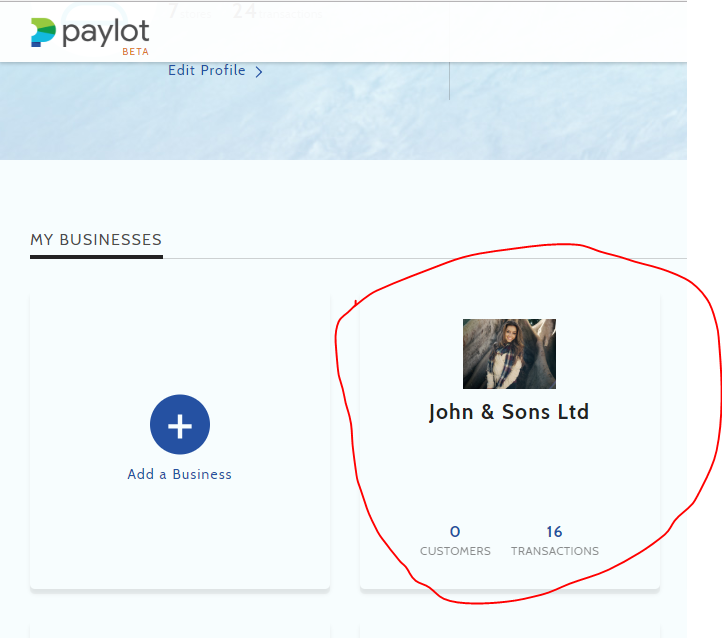
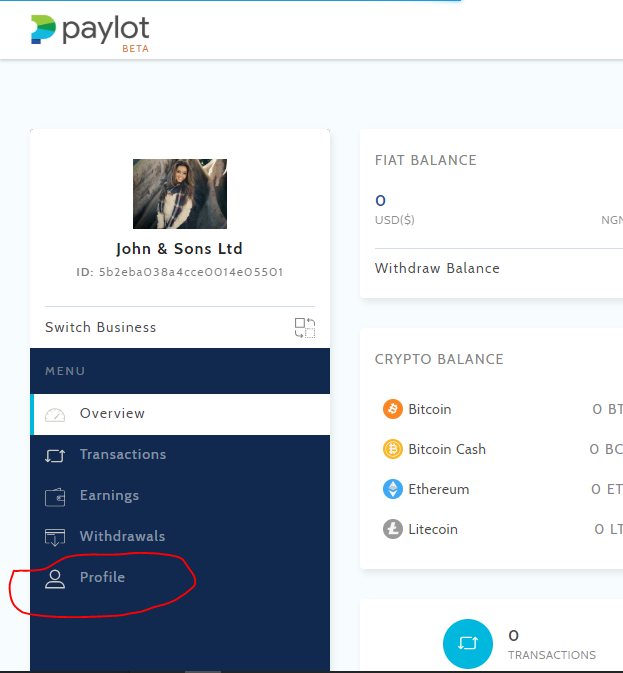
NB: Please, note that the key used is your merchant key. To get this key, go to your merchant profile by clicking one of your businesses on your dashboard @ https://paylot.co/dashboard and then clicking profile on the sidebar.
| Clicking Business | Clicking profile |
|---|---|
 |
 |
1.1. Integration Code
This HTML code shows a simple way to integrate Paylot into your webpage.
<form >
    <script src="https://js.paylot.co/v1/inline.min.js"></script>
    <button type="button" onclick="pay()"> Pay </button>
</form>

<script>
  function pay(){
    paylot({
        amount: 10000,
        key: 'pyt_pk-6efec0d34c8147eba4de783714c6eae7',
        reference: Date.now(),
        currency: 'NGN',
        payload: {
            type: 'payment',
            subject: 'Test payment',
            email: 'john.doe@gmail.com',
            sendMail: true
        },
        onClose: function(){
            console.log('I just closed the payment modal');
        }
    }, (err, tx) => {
        if(err){
            console.log('An error has occured');
        }else{
            //Transaction was successful
            console.log(tx);
        }
    });
  }
</script>
1.2. Configuration options
(* indicates required)
| Parameter | Description |
|---|---|
| amount * | The amount to be paid (number) |
| key * | The merchant public key (string) |
| reference * | A unique reference that identifies your transaction. If not found, a random reference would be generated (string) |
| currency* | The base currency (NGN, USD, BTC, ETH, LTC & BCH allowed) (string) |
| subaccount | The reference for the subaccount if available (for split payments). |
| payload.email | The email of the customer (string) |
| payload.type | The type of payment (string) |
| payload.sendMail | Determines whether an email should be sent to the user or not (boolean) |
| payload.callback | The callback URL where the webhook notification would be sent. (string) |
| onClose | Function called when popup is closed |
1.3. Callback Parameters
The paylot function has the following signature.
function paylot(options, callback);
Options specifies the Configuration options as highlighted above while callback takes the form of normal javascript callbacks i.e. accepts a function with the following signature.
function callback(error, data);
Here, in the absence of errors, the data parameter will contain the transaction details and is an object with the following properties stated below.
| Parameter | Description |
|---|---|
| reference | The transaction reference. Pay attention to this if you didn’t create a reference manually. (string) |
| sent | Specifies if payment was made successfully (boolean) |
| confirmed | Specifies if the payment has been confirmed on the blockchain (boolean) |
| amount | Specifies the intended amount in the currency selected during payment (number) |
| amountSent | Specifies the actual amount that was sent to the blockchain (number) |
NB: These are the same parameters posted to the call back url which can be set in the business profile.
2. Paylot Standard
This is necessary when you want a fully customized experience. We provides an API endpoint you can use to generate a wallet address, memo (BEP32 tokens) and the amount the customer is required to send. You are free to customize your interface the interface used to display the wallet address, amount and memo. To initialize the transaction, you are expected to use the following:
URL:
POST https://api.paylot.co/transactions/initialize
Request
The expected request is a JSON object of the format stated below.
{
  "currency": "BTC",
  "reference": "1234567",
  "key": "pyt_pk_12345678901234567890",
  "subaccount": "1111321",
  "email": "doz****@qa.team",
  "sendMail": true,
  "data": {
     "amount": 10000,
     "currency": "NGN"
   }
}
| Property | Description |
|---|---|
| currency * | This specifies the currency you would like to accept options: (BTC,ETH,LTC,BNB, etc) |
| reference * | A unique reference for the transaction. |
| key * | This is the merchant’s public key. |
| subaccount * | The reference for the subaccount if available (for split payments). |
| email * | This is the customer’s email. |
| sendMail | This specifies if we should send a mail to the customer on successful transaction |
| data.amount * | This amount you want to charge |
| data.currency * | This ISO code for the currency you are charging in. eg. NGN, USD, etc |
Response
The expected response is a JSON object of the format stated below.
{
     "amount": 0,
     "address": "string",
     "memo": "string",
     "currency": "string",
     "reference": "string"
 }
| Property | Description |
|---|---|
| currency * | This specifies the currency you would like to accept options: (BTC,ETH,LTC,BNB, etc) |
| reference * | A unique reference for the transaction. |
| amount * | This is the amount to charge customers (fee inclusive). |
| address * | This is the generated wallet address. |
| memo (BEP32 only) | This is the generated wallet. memo (BEP32 currencies only). |
NB: It is recommended that all wallet addresses are valid for a maximum of 15 minutes. Due to the volatility of the market, this is required to ensure that customers send the coins using the latest market rate. After 15 minutes, there’s a probability that the transaction won’t be picked up by us.
3. Webhook Notification (Optional)
Once we receive the notification that a transaction is marked as sent, we sent a POST request to the callback URL you have specified. Specifying a callback URL is not mandatory since the inline JS client provides a mechanism to notify you when we detect that the coins have been sent and also, you can achieve almost the same result using background processes to verify/confirm transactions.
You can specify a callback URL in 2 different ways. Although, the second option overrides the first.
- Business Settings: You can specify the callback URL at your business profile page. This can be accessed by selecting a business and clicking Profile on the left menu.
- Inline JS Client: You can specify a callback URL while initializing a transaction on the inline JS client.
The body of the webhook notification request is a JSON object with the following parameters.
| Parameter | Description |
|---|---|
| reference | The transaction reference. Pay attention to this if you didn’t create a reference manually. (string) |
| sent | Specifies if payment was made successfully (boolean) |
| confirmed | Specifies if the payment has been confirmed on the blockchain (boolean) |
| amount | Specifies the intended amount in the currency selected during payment (number) |
| amountSent | Specifies the actual amount that was sent to the blockchain (number) |